How to Remove the Windows Recovery Partition

Normally the steps to delete a partition are as follows:

  1. Right-click the Start button.
  2. Click Disk Management.
  3. Right-click the partition you wish to delete,
  4. Choose Delete Volume.
  5. Select Yes when warned that all data will be deleted.

Unfortunately this doesn’t work for Windows Recovery partitions. The Windows Recovery partitions are protected and so right clicking on them has no effect at all.

To delete the recovery partition follow these steps:

  1. Right click on the Start button.
  2. Click Command Prompt (Admin).
  3. Type diskpart.
  4. Type list disk.
  5. A list of disks will be displayed. Note the number of the disk which has the partition you wish to remove. (If in doubt open disk management and look there, see steps above).
  6. Type select disk n(Replace n with the disk number with the partition you wish to remove).
  7. Type list partition.
  8. A list of partitions will be displayed and hopefully you should see one called Recovery and it is the same size as the one you wish to remove.
  9. Type select partition n(Replace n with the partition you wish to delete).
  10. Type delete partition override.
  11. The recovery partition will now be deleted.

re: https://www.lifewire.com/delete-windows-recovery-partition-4128723

Hide Avatar in Skype for Business meeting screen

When you are in a Skype for Business meeting, if only people attend the meeting in audio, that’s fine – you will see attendants pictures or just names if they don’t have a photo or avatar set up under their account.

But if someone has a screen to share, all those ‘avatars’ will go to the right bottom corner, use quite a big chunk of the screen space. Unless people have their webcam turned on, you may see their faces and emotions, otherwise, you want to turn those static photo or avatar off or at least hide them.

Here is the solution, these small avatars actually have an official name – Video Gallery. When you hove your mouse over your own avatar, there will be a small half-transparent arrow-and-corner sign, click it, the whole area – Video Gallery will undock, then you can just minimize that “Video Gallery” window.

Be careful when you upgrade OneNote

I primarily use OneNote 2013 on my personal PC. Last week, I was thinking, Microsoft has made OneNote free forever, why don’t I just upgrade OneNote to 2016 and take advantage of the new features (if there is any).

So I searched and downloaded the installation file from Microsoft. As suggested, if you are not sure what version to use for your CPU, choose x86: setuponenotefreeretail.x86.en-us_, is the file I got. Then I installed it on my PC, along with the existing full pack of Office 2013. Lucky me, it did not replace OneNote 2013 I have.

What’s the problem?

When I run OneNote 2016 the first time, it asked me login, using my main Live account. No issues, it opened all my OneNote files in OneDrive. But, when I tried to open an OneNote notebook that only existing on my local hard drive. It gave me this error:

So, I can choose either upload this notebook from my hard drive to Microsoft OneDrive, or page a fee to activate the Office 365 subscription, although it says OneNoteFreeRetail and such promises somewhere on their web site.

I have O365 subscription, it just not linked to my main Live account, and I don’t want or need to buy another subscription. Should I upload everything include my personal archive or more sensitive notes to the cloud? Neither. So keep the old version and be cautious when you do upgrade.

Here is an article talking about similar issue on Office 2019, but I think the 2016 version has the same, as I described above. https://www.itguyswa.com.au/how-to-fix-office-365-or-office-2019-activation-or-unlicensed-product-problems/

A thread in Reddit, people talked about this already 2 years ago: https://www.reddit.com/r/OneNote/comments/4vtvfb/i_just_installed_onenote2016_on_the_same_computer/?sort=new

Of course, you can always use the online version for free, but you have to upload it to the cloud. Next time, if there is a major upgrade, I would export all my notes to PDF first.

Outlook column width not stay

Since started using the new Outlook on my new laptop, I found it’s a little bit annoying that the column width in the mail list pane did not stay. Every time after I set the comfortable width of each column so I can easily read and spot the email I am looking for, if I go to a different folder and come back, all the column width set back to default. This never happened in earlier versions, it might only apply to the latest versions 2016 and 365..

So how to fix that? There is a new “Automatic column sizing” option in Outlook. You can find that by right-clicking the heading in mail list pane and choose “View Settings”, then “Other Settings”. From there, you can uncheck “Automatic column sizing”, and do more customization in “Format Columns…”

I checked on my other PC using Outlook 2013, it has the same option but it keeps user setting intact instead of restoring to default every time.

Cannot move items to PST in Outlook

When you are trying to create a PST file or open an existing PST file in a different Outlook install, you get the following message.

“Cannot move the items. You don’t have appropriate permission to perform this operation.”

Please locate the PST file and check if you have full control permission under security tab.

And please locate the following registry key:

HKCU\Software\Microsoft\Office\14.0\Outlook\pst
Dword: pstdisablegrow
Value: 1

Resolution
If the value is 1, pleaes change it to 0 and data could then be added to the PST file.

If you cannot find the key under the path above search HKCU for the word pstdisablegrow and change the value to 0

This will allow you to archive your information.

Source:

https://uknowit.uwgb.edu/page.php?id=55834
https://social.technet.microsoft.com/Forums/ie/en-US/2b70b52c-4a2f-4341-96b9-2a004494a59c/cannot-move-the-items-you-dont-have-appropriate-permission-to-perform-this-operation?forum=outlook

Simple, Static web hosting in Azure

Some time you want to spin up a simple, static web hosting somewhere, just HTML, JavaScript the most. If you don’t bother to create a new WordPress site or set up a Windows Server with IIS etc in Azure. Now there is a solution.

Azure treats this as a serverless service, site content are hosted in Azure Storage account, and that is enough to get a new website running.  The service itself is free as preview now, but storage account itself still has a cost.

Here is announcement blog: https://azure.microsoft.com/en-au/blog/azure-storage-static-web-hosting-public-preview/

Here is the main MS Doc: https://docs.microsoft.com/en-us/azure/storage/blobs/storage-blob-static-website

You may already knew, how to create a storage account: https://docs.microsoft.com/en-us/azure/storage/common/storage-quickstart-create-account?tabs=portal

Very handy tool, still in beta I guess: https://azure.microsoft.com/en-us/features/storage-explorer/, you can use it to directly access Azure storage contents.

You will have a URL like: https://storageaccountname.zone.web.core.windows.net/index.html, the HTML file will be in the $web container.

Of course, you will be able to use your own domain name for the site.

Thumbnail Previews not showing in Windows 10 File Explorer

Use Disk Cleanup to remove your thumbnails

Your thumbnails use thumbnail cache, but if the thumbnail cache is corrupted you might experience this problem. To fix the issue, you need to remove the thumbnail cache and Windows will recreate it. This is a simple process and you can do it by following these steps:

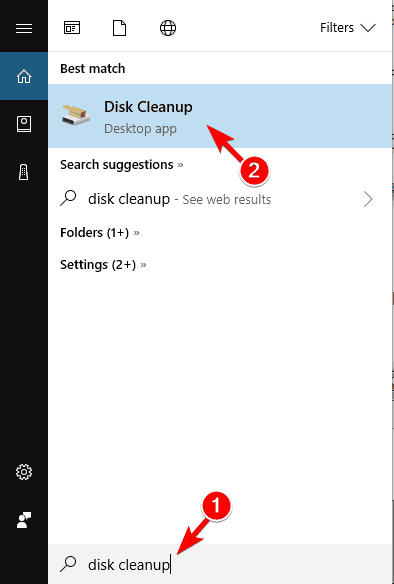
  1. Press Windows Key + S and enter disk cleanup. Select Disk Cleanup from the menu. Alternatively, you can just open the Start Menu and type disk cleanup to search for it.
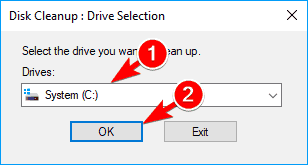
  2. Once Disk Cleanup starts you’ll be asked to select the drive you wish to scan. Select your System drive, by default it should be C, and click on OK.
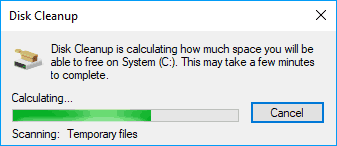
  3. Wait while Disk Cleanup scans your drive.
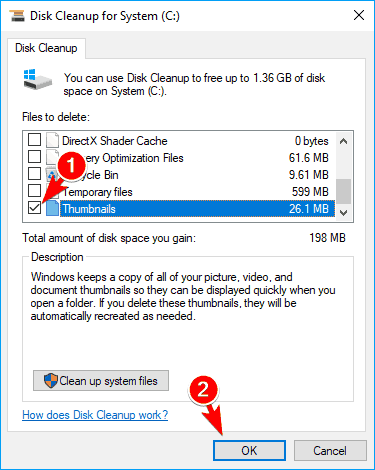
  4. When Disk Cleanup window appears, check Thumbnails from the list and click on OK. Few users are suggesting to select Temporary files as well, so you might want to do that.

Windows will now remove the thumbnail cache from your PC. Once the thumbnail cache is removed, Windows will generate it again and your problem should be resolved completely.

There are 21 different ways to fix this, No. 7 is working for me, so I copied it here. This is the source URL: https://windowsreport.com/thumbnail-previews-not-showing/

Also other reference:

https://www.wikihow.com/Enable-Image-Preview-to-Display-Pictures-in-a-Folder-(Windows-10)#step_2_1

https://www.thewindowsclub.com/thumbnail-previews-not-showing-windows

Windows Server 2012 R2: How to add the DHCP role using PowerShell?

Found this blog quite helpful in the middle of a deployment, when getting “Failed to open the runspace pool. The Server Manager WinRM plug-in might be corrupted or missing” in GUI. So PowerShell is more capable if you are confident what you are doing. Here is what I put in the ISE to execute one by one.
Install-WindowsFeature DHCP -IncludeManagementTools
Get-WindowsFeature
Install-WindowsFeature WINS -IncludeManagementTools
Get-WindowsFeature

Bekim Dauti's Blog

The following is a sample chapter from the e-Book Windows Server 2012 R2: How to install and add roles? (Server Core). Enjoy reading!

This is what people need: an easy-to-deploy, easy-to-use tool.” Nat Friedman

What is Dynamic Host Configuration Protocol (DHCP)?

Basically, Dynamic Host Configuration Protocol (DHCP) is a computer network protocol that assigns IP addresses to computers on a network. The working principle of DHCP briefly is described through the acronym DORA which means Discovery, Offer, Request, and Acknowledgement. In a computer network, when you turn on your computer and the operating system boots up the DHCP Client service transmits the request for an IP address. In fact, this request is an attempt to identify whether or not a DHCP server is available on a LAN. If it is, the DHCP server accepts the DHCPDISCOVER message from the client, reserves an IP address for the client, and…

View original post 328 more words

“The RPC server is unavailable”

In the scenario of getting event logs remotely, using Event Viewer or PowerShell, some time in an unfamiliar environment, the system admin may get this error “The RPC server is unavailable” even the correct credential is supplied.

Why? The service is running on the remote host – most of the time it’s a Windows Server. There must be something block the traffic – Windows Server itself or the network.

Look into the Windows server – the target host, there are several places to check – The Windows Firewall, the Group Policy. Many online resources focused on WMI Group rules, such as running the following command to enable this group of firewall rules – 3 Inbound and 1 Outbound.

> netsh advfirewall firewall set rule group=”Windows Management Instrumentation (WMI)” new enable=yes

The same approach is to open 3 Inbound rules using Windows Firewall with Advanced Security or GP Editor:

Computer Configuration
– Windows Settings
— Security Settings
— Windows Firewall Advanced Security
—- Inbound Rules
—- Right-click and select ‘New Rule’ (Key point)
—- Predefined radio button
—- Choose Remote Event Log Management (Drop down list)
—- Click Next
—- Accept the defaults and click ‘Next’
—- Choose Allow the connection and click ‘Finish’

But, sometimes these local firewall rules are already enabled, by default, unless they are disabled on purpose. Then what?  There is another place to look at, despite the message “The RPC server is unavailable”, some newer operation systems give more information in a pop-up.

image

Now look at these two rules, they could be disabled, just enable them you will be able to access Event Logs remotely.

This is tested in both Event Viewer and PowerShell, on Windows Server 2012 R2.

p.s. I don’t think .Net Framework 3.5 is necessary in this case, some online article mentioned that though. But still worth to check if the following services are running on the target host:

  • Windows Management Instrumentation service
  • TCP/IP NetBIOS Helper service
  • Remote Procedure Call (RPC) service

Remote Desktop Services (RDS) in Azure

It is a Dev/Test environtment available to all Azure subscribers. I tried this out and it is not too bad. In my opinion, this is the way to go for Microsoft, because it provides a package to potential customers that are not quite familiar with how Azure environment is to be built, either for the PoC purpose or next, in production. Once people get more idea on how it works, there will be less barrier to adopt more in the cloud.

Traditionally, when we start build an infrastructure and services in data center, we started with IP allocation, physical location/rack/power supply, network patching, switches/load balancers, servers, storage, then firewall, iLO/DRAC, O/S build, license, etc.  But when we start in Azure, where I should start is a big question to many of us.  If one just wants to do some testing but need more than a couple of servers and in a small to medium scale, there is no sense to go through all the hassles.

This RDS testing package I set up over the long weekend is pretty simple to start with. Under the basic concept of MS Remote Desktop Services, you can go through the documentation and team blog first, then start picking the size and scale of the environment – redundency, vm size, etc.  At least you will need one DC on Windows Server 2012 R2, and three servers on Windows Server 2016 – RDSH, RD Broker, RD Gateway (including RD Web Access) – other service can be combined such as RD license server and file storage. So far I don’t see there is firewall between them like the diagram showed, all testing servers are in the same subnet (10.0.0.x), of course Azure would guard everything that are accessible from the Internet.

Most steps are straight forward as I did before for  the similar services. Only a few places in the document maybe still referring to a different version of Windows Server (2012 R2 vs 2016 or vice versa).

Remote Desktop Services @ MS Docs

Windows Server RDS team blog site

First look at updates coming to RDS (Sept 2017)

Here are links to Windows Server 2012 based RDS:

https://workspot.zendesk.com/hc/en-us/articles/202698935-Remote-Desktop-Services-RDS-Configuration-Guide-for-Remote-Desktop-and-RemoteApp

https://blogs.technet.microsoft.com/yungchou/2013/02/07/remote-desktop-services-rds-quick-start-deployment-for-remoteapp-windows-server-2012-style/

Other team blogs, some are not current but future ideas:

https://remotedesktop.uservoice.com/forums/301635-remote-desktop-for-windows-universal

http://microsoftplatform.blogspot.ca/

Unrelated links:

https://azure.microsoft.com/en-us/roadmap/

https://azure.microsoft.com/en-us/resources/templates/

https://learningportal.microsoft.com/learning-path/?search=&jobroles=2&products=4